

Author of The Complete Guide to Pressure Canning, Diane Devereaux, The Canning Diva®, shares her top ten rules of pressure canning so canners may stay safe in the kitchen and conquer their fears of using a pressure canner.
I hear all the time from followers and class attendees – I am scared to death of a pressure canner. Those of you who know me know I am a huge advocate and believer that knowledge is power – which is why I set out to create The Canning Diva® brand. If I teach you practical methods and share safe techniques and you learn the science and math plus the in’s and out’s of home canning – the fear subsides and you’re filled with confidence and joy when you see gorgeous jars filled with nutritional goodness. Real food – and you know where it came from and what is in each jar!
Today I wanted to share with you the Top 10 Rules of Pressure Canning whether you are new to canning or have been pressure canning for years. Even those of us veteran canners can learn something new.

Rule 1
Always keep your vent pipe clean and free from debris.
Rule 2
Vinegar is your best friend. Use it to clean the jar rims and screw threads, and add 2 tablespoons to the canner water prior to processing to keep the jars clean and free of mineral deposits.
Rule 3
Always let your canner vent for 10 minutes before placing the weighted gauge or counter-weight on the vent pipe.
Rule 4
Always let your canner’s PSI drop to zero naturally before taking off the lid.
Rule 5
Protect your face and hands from steam when removing the canner lid after processing.
Rule 6
After processing and removing the canner lid, let your jars sit for a minimum of 5 minutes before removing them from the canner.
Rule 7
Use a reliable timer. We get busy in the kitchen. Trying to keep track of the time by simply watching the clock and relying on memory can be a costly mistake.
Rule 8
Never set you timer until your pressure canner reaches the required PSI.
Rule 9
Do not place hot food in a cold jar or place hot jars on cold surfaces. Treat your glass jars as you would a glass coffee pot; avoid drastic temperature swings.
Rule 10
Do not let the PSI dip below the required level specified in the recipe. If this happens, you will need to achieve the required PSI and restart the timer.
While there are many more “rules” we use to stay safe in the kitchen so we may process our low-acid foods without issue, the above is simply a list of my top ten rules of pressure canning. I am sure there are more rules you have created along the way – be sure to share them with fellow canners, especially if they are new to home canning and can use our support.
I have recorded a podcast to dive deeper into the rationale used to support each of my rules. Click the image to tune in and learn more about my top 10 rules of pressure canning so you too may master this craft!
In this episode, The Canning Diva® will also provide you with several valuable tips for successful pressure canning of low acid foods. Learn how to safely and confidently pressure can food in jars so you may have soups, stews, meat, meals-in-a-jar and more on your pantry shelf for years to come.
Tips for Successful
Pressure Canning
- Maintain the correct pressure. When using a dial-gauge pressure canner, keeping the pressure exactly at the specified PSI is quire difficult. It is okay to keep our canner 2 or 3 PSI higher than the required temperature, but do not let the pressure exceed 4 PSI above what is required or the jars may result in liquid loss from syphoning once you bring the temperature back down to correct the increase.
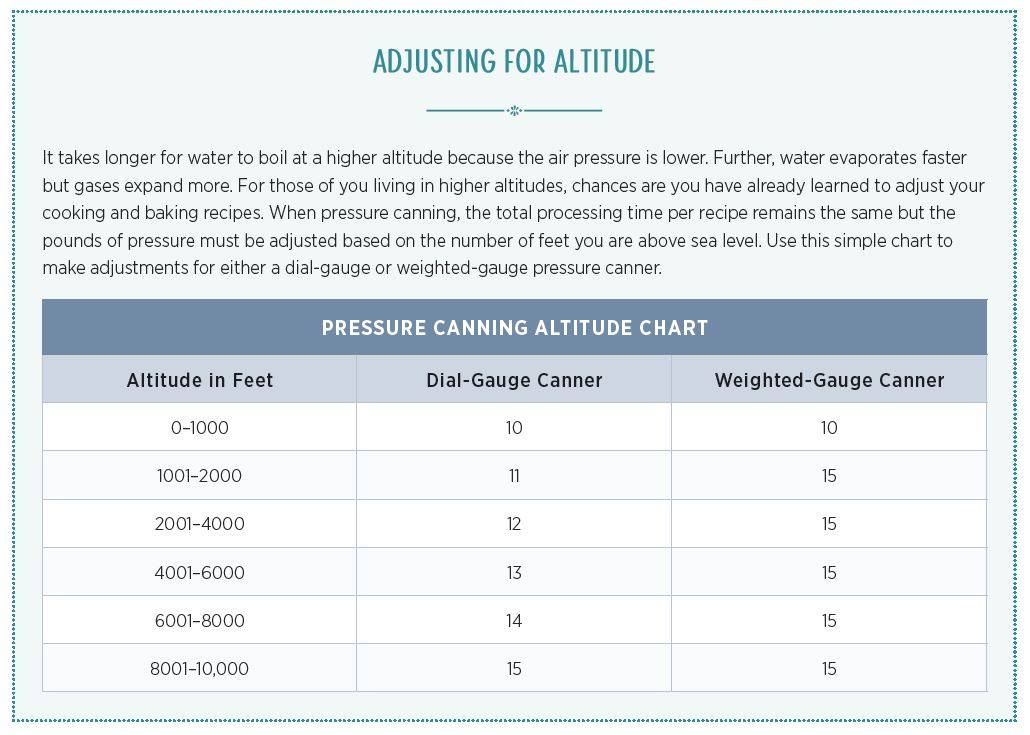
- Know your altitude. Because foods take longer to cook in higher elevations, it is imperative that you now your altitude prior to canning so you can make the proper adjustments to temperature and processing time. Us a Pressure Canning Altitude Chart like the one here to ensure that you adjust your PSI correctly.
- Designate an area in your home to store your canning supplies. Staying organized is the best way to have everything at the ready, preventing you from scrambling for something when you need it most.
- Stock up on weighted gauges and/or counter-weights. Without this simple, inexpensive tool, your pressure canner will not work. Purchase a second weighted gauge if you have a weighted gauge canner, or a second counterweight, if you have a dial-gauge canner. Keep it in a safe place with all of your canning supplies. It is a lifesaver in the event you lost the weight that came with the pressure canner.
Thank you and many blessings to you this canning season! Be sure to follow me on Facebook and Instagram so you may stay current on all things canning and preserving.
Happy Canning~
xx,
Diane, The Canning Diva®